Introduction:
Hello Developers, welcome to my blog. In this blog, I will be covering the SQL Server 2019 Installation. There are different ways with which this can be done.
By default when you install SQL Server, you will be able to log in to it using Windows Authentication. In this blog, I will help you to create credentials for logging into the SQL Server using SQL Server Authentication as well.
SQL Server 2019 Installation:
Download the Setup Files:
- Download the Setup File of SQL Server 2019 from here
- You will be having two options:
- Developer Edition - In this blog, we will be using Developer Edition as we are installing SQL Server for our local environment. This edition works ONLY for Developer and Test Systems.
- Enterprise Edition: This is preferred for installing SQL Server in higher environments such as Production. This has premium performance and capabilities as compared to the Developer Edition.
- Once you have Downloaded the Developer Edition. An SQL2019-SSEI-Dev.exe file will be downloaded.
- Open it in the Administrator Mode.

- Since we have to change some configurations, we will select the Download Media option from the three options provided in the image above.
- After the download is complete, you will get a SETUP.exe

- Run this in Administrator mode.
- Go to the Installation Tab > New SQL Server stand-alone installation highlighted in Red.

- Product Key: In this case, we are selecting the Free edition.

- License Terms: Read the Microsoft Software License Terms in this section

- Microsoft Update: Check this checkbox as per your interest.

- Install Rules: This step identifies the potential problems and gives the status to each rule. Make sure all the Rules are passed along with the Windows Firewall Rule.
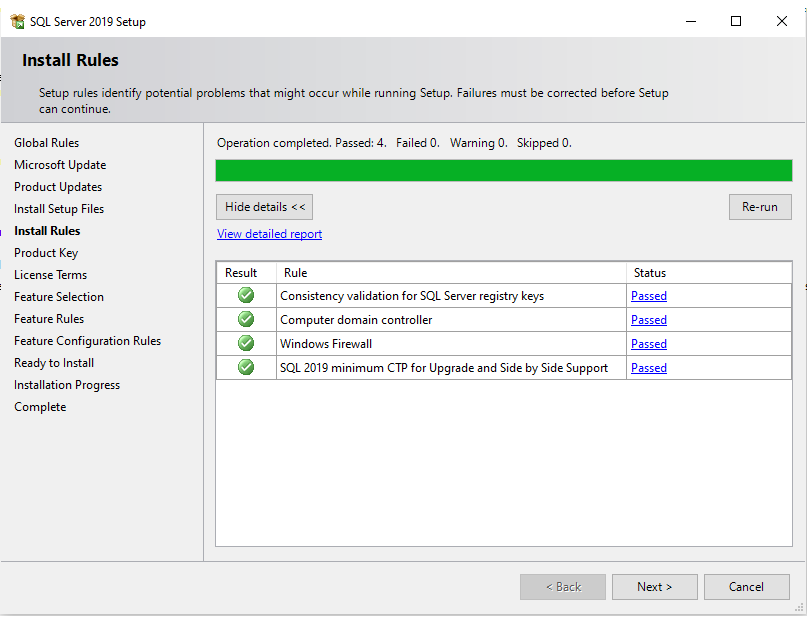 Note: If the Windows Firewall Rule is NOT passed successfully, you may face issues while connecting to your SQL Server via SSMS.
 - Feature Selection: You can check the settings if required. We will be selecting the default settings in this blog.

- Installation Type: Since I already have an instance installed it is showing me the below options.

- If you are installing the SQL Server for the first time, you will get two options:
- Default - This will name your SQL instance by giving it a default name.
- Named Instance - If you select this option, you can name your SQL Instance
- Database Engine Configuration: We have to specify the Authentication Mode and also add a user in the Specify SQL Server Administrators.
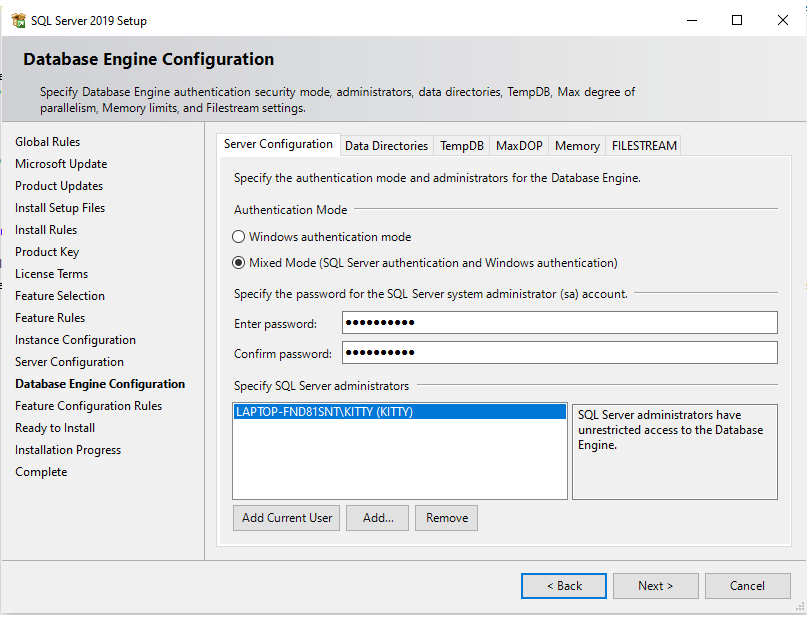
- There are two Authentication Modes:
- Windows Authentication Mode: This will allow you to log in to the SQL Server instance using Windows Authentication mode.
- Mixed Mode: If you select the Mixed mode, you will be able to log in from both Windows Authentication mode and SQL Server Authentication mode. To log in from the SQL Server Authentication mode, you will have to specify a password.
- Note:
- Remember the password mentioned while installing as this will help you to log in to the SQL Server.
- The default username is sa
- Once all the above steps are complete click on Next and then click install.


You can now access, monitor, and configure the installed SQL Server using SQL Server Management Studio (SSMS)
See you in my next blog. Till then Keep Learning and Keep Growing!! 😊
Comments
Post a Comment